October 31, 2010

Anything Goes Paper Players #22 Cake, Cake and More Cake!

Hi everyone.... I have LOTS of CAKE to show you today, so I'm going to be a little gabby;  hope you can bare with me for a while.
This post  is for the "Anything Goes" challenge #22  at The Paper Players ".
  I also have to say my FIRST cake posted is going to be a 'joint' post with my friend Nancy over at Nanc's Niche.  It was made by both of us and this cake thing all started because we never celebrated the birthday of one of our scrappers so Nancy and I decided to make her a cake after the fact...AND it's all paper! ....  and here it is.
We made a "CARROT CAKE"! Isn't a adorable?
Nancy made easy business out of cutting out of the pieces as she had bought the SVG file. We hooked that up to her Cricut and the Cricut did all the hard work! Cool. Then we had to score each piece in a million places so we could fold and glue each 'Slice' together. She also made the cute carrots using a Cricut cartridge that decorate the top. The sides are stamped with chocolate chip and more mustard ink to represent the NUTS usually found on the sides of most carrots cakes; as to the two NUTS making it; but we were laughing all the way. 

We filled each slice with paper crafting goodies: small stamps, small punches, ribbons, buttons, brads, and some chocolate of course! Each bundle was wrapped in orange tissue paper which gave each slice a burst of color when the box was opened. Our friend just LOVED it, and so do we.

Well now I bet you think that is the end of the story..... but ohhhhhhh Nnooooooooo.
After it was completed I couldn't wait to show my other pals and my daughter (who lives in Missouri). 
She thought it was FABULOUS and that it would a great idea for my granddaughter's birthday party for her preschool class of 10. The school also promotes non-sweet celebrations.
Well Gramma just couldn't say no.... so here I went again on my own. 

I chose to do a Safari cake... and look what I ended up with.
I wanted to do some stamping too, so I heat embossed the animals on each slice and colored them using markers and inks then cut them out and attached with glue dots. Isn't it cute? I also knew I wanted to use this goofy elephant stamp I have but it was too large for the side of the slices, so I made my own topper. Too funny heh?
I created the tree and flowers using several dies and punches. The little goofy elephant is on both sides so it doesn't matter which way he sits.
The slices where embellished with some zig zag strips to make it look like yummy chocolate layered in the marble card stock cake slices.
Then each slice was filled with not too sweet goodies for each of the 10 kids, teacher and assistant in the class. They will each get 2 note pads, 1 marker, 1 crayon eraser, 1 fuzzy sticker, 1 sucker, and 1 small candy bar.
This worked out perfectly for the class of 10 plus teacher and assistant with a 12 slice cake. I finished it up and sent it out stacking the pieces and topper in a priority mail box. She called me today to tell gramma she loved it and she can't wait to take it to class on Thursday for her Big 5th Birthday party at preschool.  

Okay, now I know you thought I was done, but ooooooohhhhhhhhhh nnnoooooooooo. Just one more.
This last cake is NOT a stamping nor paper project, but I'd like to share it anyway. This is Diaper Cake I made for one of my colleagues at work. It's for a baby boy. The only thing on it that is from my paper crafts is the Card, the ribbon and the tag I made with the RECIPE for the cake. The rest is just "stuff" for baby that you can find on the recipe.

I started with cardboard pizza round and then rolled (with the help of my girlfriend Sharon) 50 new born Pampers, wash cloths, 5 Onesies, 3 hats, 2 receiving blankets, socks that are rolled and held with small rubber bands.
The cake is made of 3 layers and each layer has a Large rubber band around it; each layer is also stuffed with baby shampoo, lotion, and baby wipes, in the middle. Then within the diapers there is 4 bottles, teething rings, rattles, nose aspirator, medicine dropper, outlet covers, frog toy, and topped off with a Rubber Ducky!


 Then I added ribbons over the large rubber bands of each layer and put it in a shrink wrap bag and heated with a blow dryer to hold it all together.

 I attached the RECIPE so the person would know what was IN the cake without tearing it apart right away.

Tied a bow and added my card.

Wha La!  Ok........ That is finally...... THE END.
Whew that was a Lot of Cake!!     
Are you full yet?

 
Hootie says "Thanks for stopping by and Please leave a comment and Let me know what you think".


October 29, 2010

Winter Post - {PPA66 Sketch challenge}

Today's post is for the sketch challenge created by Margaret Moody at Pals Paper Arts (PPA)  and here's her sketch ..
Wow. 5 layers! There are so many great stamp sets to choose from, but I opt for one of my favorites... "Winter Post" - It just reminds me of my childhood, and I guess that's because we always went ice skating on the frozen ponds and creeks around my house. With that said....here's my card.


For layer #1 I started with Crumb cake CS and embossed it with a CB Snowflake embossing folder. I also punched the corners with a stash corner punch to soften the edges. I think so any way.
Layer #2 was made using Crumb cake ink on Vary Vanilla CS for ALL the images. I  first stamped with a stash BG distress stamp, then added some snowflakes from the Winter Post set. Next I stamped the Post Card stamp in a vertical position to the left, and stamped the Skaters off-set to the right. I finished it off with Holiday greeting stamp in Hunter Green  (retired) ink.  I matted the VV piece to Cherry Cobbler CS.

 Layer #3 was punched  from a scrap strip of Elegant Soiree DSP with the scallop edge punch and glued to the VV piece. It's hard to see, but if you look close you can see the scallops. I wanted a suttle look, and I think I got it with the tone on tone.

 Layer #4 was created by wrapping the matted piece with twine and offset a tied  bow to the left.

I mounted the matted piece to the card front with dimensionals.
 Next for Layer #5 I stamped the sentiment from the same set in Hunter on the VV and punched it out with the Designer Label Large punch. I punch a second label in cherry cobbler, cut it half to mat the sentiment. I added another small twine  bow to the sentiment to 'tie' it to the image. I popped this up as well using a dimensionals again.

All the pieces were distressed just a tad using crumb cake ink to soften the edges.  The same effect distressed BG, snowflakes and corners were used on the inside, and I added two cherry cobbler corners from the photo corners punch.  The sentiment from the Winter Post set was stamped in cherry cobbler, then glued to the inside.


Well that's my card and I hope you liked it.
Hootie says "Thanks for stopping by and please leave a comment".

October 24, 2010

PUNCH Art card

Today's post is a CASE from Linda Aarhus, one of my favorite blogs to follow. She did a HUGE punch art series this summer that was fantastic, you can see her great punch art here that gave me the inspiration.
Isn't this the cutes ever? Who wouldn't want to make one.
So I did!


Here's mine.... This cute card I made for my brother to to write a note to say "THANKS"... for helping me out of a tight spot. Well not really a tight spot... but it was a big favor non the less. So it  fit for me.
I have looking and looking at the 'Totally Tools' set, but I don't have it yet with that exact sentiment... so I had to hand write it, but that's okay.

I used my circle punches and a few eyelets to adhere them to a strip of silver CS scored down the center to create the wrench. I popped it up on a piece of glossy copper CS I embossed with the square lattice emboss folder, then added the sentiment (hand written) on the Decorative Label piece.


Well it was pretty easy to do. Just a few punches and some distressing....... whaa la!


Hootie says "Thanks for stopping by and please leave a comment."

October 22, 2010

Paper Players #20 Sketch Challenge

Hi everyone. Wow this is really a last minute post for The Papers Players sketch challenge that is due by midnight Friday. yipes! I actually haven't been posting much lately between:  my PC being down, then a long week Gal Pal vacation to CABO.... yeah baby! but I thought I'd give it a try anyway.  Here is the PP#20 sketch


and here is my card.


This is card is pretty self explanatory using the strips of Woodland Walk DSP glued to Early Expresso CS then run through the Big Shot with the Vintage Wallpaer embossing folder. Doesn't that look cool with the DSP embossed too? I glued a piece of EE ribbon around the center of the mat to cover where the two pieces of DSP meet, then glued to the Kraft CS card base. 

I then stamped the littel french hens on WW CS with EE ink and colored in around the feet with Pear Pizzazz write marker, then glued the WW piece to a Pear Pizzazz mat.  I added  a cute flower button from the Brights groups with glue dot for a finishing touch of color then popped it up with dimensionals. There you have it...  wha la! Done. Easy Peasy. 
Just love that  Happy Together stamp set. So cute.

Hootie says "Thanks for stopping by and please leave a comment.

October 4, 2010

Paper Players Challenge #18 Monochromatic

Well HI there everyone......... so nice to be back. I've been without a PC for weeks. Whew!...
I felt like I had two broken arms! So frustrating not to be able to post anything or play in any challenges... until now.
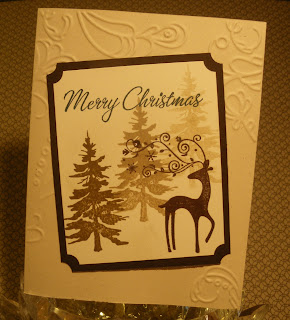
While I was in 'down' mode, I started on my Christmas cards, not knowing what challenges were out there. So I do believe, one will qualify for this weeks challenge at Paper Players which is monochromatic. Most of the materials are SU (some of it retired) with a few stash items thrown in, such as the bling.
Now here is my card...

I started with Very Vanilla CS and embossed with the Elegant Lines emboss folder. I then stamped my tree in choc chip, soft suede and river rock. After that I stamped "Dasher" in early expresso and the sentiment in hunter green. I then sponged on a light touch of campaign mist Shimmer Paint over the whole front, then added the brown crystal to Dasher's antler just for a bit of bling. The corners are punched with the ticket punch on the WW and Expresso mats then popped up with dimensionals.

 Here is a sneak at the inside... can't have Christmas without Santa! 


 Pretty simple.
For my personal Christmas cards I am going with the red card stock matting which I'll post below, but my first prototype was with Early Expresso matting, which worked out great for me to enter this challenge. That and having a computer that is up and running.... thanks Sharon.


Now here is the same card with RED accents.

A little close up of this one too. Well there you have it. Hope you like them.

Hootie says "Thanks for stopping by and please leave a comments".

LinkWithin

Related Posts with Thumbnails