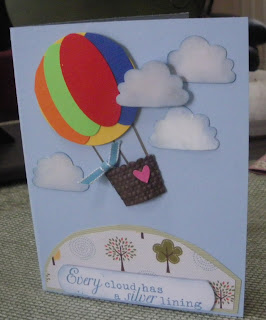
My card today is for the Pal Paper Arts (PPA) challenge #87 "Technique Punches". We are challenged to do a design using a punch, or two or three! How fun! I love punch art cards and today my card uses the new Build-a-Cupcake Punch, a Circle Punch and the Oval Punch. We made this card in my last class and the girls had lots of fun doing it. They couldn't believe we going to use a Cupcake punch!
Now here is my card.
I've seen many hot air balloons done with large circles and stamped baskets, but for my card, my inspiration is from Ann Schach that made several balloons using oval punches for the balloon section in the fall of 2010 and you can see one or two of them here.
I started with a bashful blue card base and started punching! I punched up some scraps of card stock in the primary colors. First we punched a 2" circle in yellow. Then we punched some ovals in red, green, orange and blue. [This balloon uses 4 colors made with large oval punch, but you can use more if you like]. I started by gluing the outside ovals to the yellow circle, then popped the top one up a dimensional.
I then took strips of early espresso or chocolate chip scraps and punched out the basket from the bottom of the cupcake. Then it was embossed with the BS using the square lattice embossing folder. Looks just a basket too, don't ya think? I punched a bright pink heart from the small heart punch and used a glue dot to attach it to the basket front.
I had to lay the piece on the card front before attaching permanently to figure out where it would be "flying" and I made a few pencil marks to draw my balloon cables with stampin' write marker.
Then I glued down the balloon to the card front and I used dimensionals to pop up the basket. I also 'bowed' the basket with my fingers as I stuck it down to give it a concave appearance.
I made a knot bow with marina mist 1/8" ribbon and attached with a small glue dot to one of the cables.
Now the really FUN part.....
I punched out 4 cupcake frosting to use as clouds! Can you believe it? I distressed each cloud with marina mist ink and glue to the card after playing around with the positions. I decided to pop one up with dimensionals and overlap the balloon to make appear like the balloon was traveling through the clouds. THEN.... I took a dauber and lightly, lightly, lightly daubed up the clouds with some shimmer mist for a touch of shine.
Now I needed some earth!
I choose this DSP (retired) that had some trees! I just hand cut a piece and matted with a scrap of pear pizzazz and glued down. Then I stamped the sentiment, rounded the ends, and distressed with marina mist ink; popped this up too. (Boy oh boy I love to POP up stuff don't I?)
The inside sentiment was stamped in marina mist on w.w. cs and matted with light pink. I created the rainbow using my double sided tape roll and Stampin' Up write markers. It still looked a little plain so I created more clouds using marina mist ink in the negative from the punched clouds as a template.
One more little heart and Done!
Hope you like my Build-a-Cupcake Hot Air Balloon punch card. Now get out a PUNCH and create!
Hootie says "Thanks for stopping by and please leave a comment".
Hugs
DIANE


