March 31, 2011

Technique Punches Card for the PPA {#87}

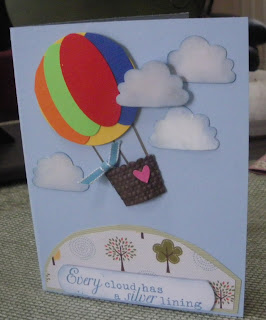
My card today is for the Pal Paper Arts (PPA) challenge #87 "Technique Punches".  We are challenged to do a design using a punch, or two or three! How fun! I love punch art cards and today my card uses the new Build-a-Cupcake Punch, a Circle Punch and the Oval Punch. We made this card in my last class and the girls had lots of fun doing it. They couldn't believe we going to use a Cupcake punch!
Now here is my card.  
I've seen many hot air balloons done with large circles and stamped baskets, but for my card, my inspiration is from Ann Schach that made several balloons using oval punches for the balloon section in the fall of 2010 and you can see one or two of them here.
 I started with a bashful blue card base and started punching! I punched up some scraps of card stock in the primary colors.  First we punched a 2" circle in yellow. Then we punched some ovals in red, green, orange and blue. [This balloon uses 4 colors made with large oval punch, but you can use more if you like].  I started by gluing the outside ovals to the yellow circle, then popped the top one up a dimensional.

I then took strips of early espresso or chocolate chip scraps and punched out the basket from the bottom of the cupcake. Then it was embossed with the BS using the square lattice embossing folder. Looks just a basket too, don't ya think?  I punched a bright pink heart from the small heart punch and used a glue dot to attach it to the basket front.
I had to lay the piece on the card front before attaching permanently to figure out where it would be "flying" and I made a few pencil marks to draw my balloon cables with stampin' write marker.
Then I glued down the balloon to the card front and I used dimensionals to pop up the basket. I also 'bowed' the basket with my fingers as I stuck it down to give it a concave appearance.
I made a knot bow with marina mist 1/8" ribbon and attached with a small glue dot to one of the cables.
Now the really FUN part.....
I punched out 4 cupcake frosting to use as clouds! Can you believe it? I distressed each cloud with marina mist ink and glue to the card after playing around with the positions. I decided to pop one up with dimensionals and overlap the balloon to make appear like the balloon was traveling through the clouds.  THEN.... I took a dauber and lightly, lightly, lightly daubed up the clouds with some shimmer mist for a touch of shine.
Now I needed some earth!
I choose this DSP (retired) that had some trees! I just hand cut a piece and matted with a scrap of pear pizzazz and glued down. Then I stamped the sentiment, rounded the ends, and distressed with marina mist ink; popped this up too. (Boy oh boy I love to POP up stuff don't I?)

The inside sentiment was stamped in marina mist on w.w. cs and matted with light pink. I created the rainbow using my double sided tape roll and Stampin' Up write markers. It still looked a little plain so I created more clouds using marina mist ink in the negative from the punched clouds as a template. 
One more little heart and Done!

Hope you like my Build-a-Cupcake Hot Air Balloon punch card. Now get out a PUNCH and create!
Hootie says "Thanks for stopping by and please leave a comment".
Hugs
DIANE

March 27, 2011

SEW Suite is TuTu cute - {PP#40}

Happy Sunday AGAIN!  I know, I know... two posts in one day. Well I spent yesterday making several cards and I think I have one that will work for the Paper Players Sketch challenge #40. Marina made a great sketch and here it is:
Here is my card that I think will work if you hold you head sideways for the DSP placement.

I used the "Sew Suite" stamp set that I'm just in love with. "Sew" many things to do with it and "Sew" cute!.
I matted the card base with that yummy "Springtime Vintage" DSP. 
On W.W. cs I stamped the dress form  and pin cushion in espresso ink. The pin cushion was colored with blushing bride SU write marker and I used a silver paint pen to color the pin heads and the dress form stand.
The cutest part of this card is the gathered ribbon skirt. [I've seen this on several other blogs so I CASED the idea, but I can't remember all the names of the designers nor do I know which one actually came up with idea, so I apologize I can't give credit to the creator... but 'thanks' because it is such a cute idea.]
I stamped a second form on w.w. cs and cut it out. Then I stamped a third piece on DSP and cut out the top half and glued to the second w.w. form. I wrapped the gathered ribbon around the bottom half of the second w.w. form and pop dotted it to the original stamped dress form.  I matted the w.w. piece with matching cs and popped this up on the card front,
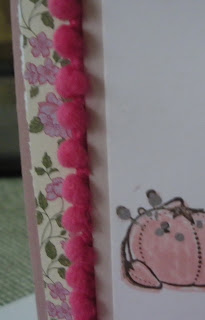
Then I tucked and glued a piece of melon mambo Pom Pom trim along the edge of the focal point. This was my first time using the pom pom trim which I only have in melon mambo, but it is so fun and cute, I will be ordering it in more colors.  
I stamped the sentiment on w.w. in espresso and punched out with new small oval punch and glued that to a oval of DSP which was attached to the bottom of the focal point with a dimensional.
I cut two piece skinny, skinny strips of card stock to use as thread on the Big Vintage button and added to the front with a large glue dot.
Can you see my card stock thread?
The inside has touches of the front DSP and I used a sentiment stamp of "Puns from the Past".
The final touch was a stamp on the lined envelope. Done!
Hope you like my little tu tu card made with the "Sew" cute "Sew Suite" stamp set.

Hootie says "thanks for stopping by and please leave a comment".

Hugs
Diane

Just My Stlye - ColourQ {#77}

Happy Sunday everyone.
This post is for the color challenge over at the  ColourQ { #77} blog and what a color sample to work with! Wow. This was the hardest color challenge for me so far. Although the inspiration photo is gorgeous, when I went to put something together that was a different story. Here are the CQC colors.
See what I mean? Gorgeous right?
After I sat and stared for what seems to be hours, I got out the card stock and threw it in pile to see what would pop into my mind........... and NOT so much! After staring at the pile I thought...okay. Clean simple mats! So that is how I arrived at my card.
This post is going to be a super quick one as there is so little to explain on the card since it's mostly a series of mats! LOTS and lots of mats made of the CQ colors: Concord Grape, Kiwi Kiss, Bermuda Bay and Bashful Blue. I started with a kiwi base and started layering with a series that was pleasing to ME eyes. Each layer is corner punched with the ticket punch. The top layer is stamped on some scrap DSP with a Just My Style retired SU stamp I just can't get rid of ... wink.
A little bit of bling was placed to right side [can you tell why?]. It's because I off-set the top 3 layers to the left so it would line up the edges with the same 1/8" dimension...but... as I do with most of my mats to conserve the precious card stock, I usually die cut the centers with any die that will fit to be used as mats on future cards. So if you look really close you notice the right side has a Larger 1/2" edge which created a  wavy bit of concord crush peeking out through the die cut in the bermuda bay. By placing the bling in the center it looks like this is suppose to be that way! Right? Well I convinced myself it did.
Here's a peek at the inside using the new Four Frames set.. stamped in concord crush, then double matted with concord crush and bermuda bay cs.
Done!
Hope you like my VERY challenging color card.

Hootie says "Thanks for stopping by and please leave a comment".

Hugs,
Diane

March 24, 2011

Embossing - PPA86

Hi there.
Today's post is another quick one for the Pals Paper Arts challenge #86 - "Embossing". The challenge is to use embossing on your card any way you like. So with that said here is my card which needs very explanation of how it went together.
I started with Natural White card stock for the base ran that through my Big Shot with the "Framed Tulips" embossing folder. Then I filled the center with some of my favorite DSP - Sweet Pea [retired]. I know it's retired, but I keep hoping it will come back in the new IBC.. a girl can dream; right?
The sentiment on the scallop circle is from the SAB set "So Happy for You" stamped in melon mambo ink and matted on a scalloped melon mambo cs circle, then popped up with a few dimensionals. The second sentiment is stamped on a scrap of vellum, gave it a quick curl with my bone folder, then I cut the banner end and secured it to the card front with a glue dot.
To hide the glue dot showing through the vellum I added a pretty Designer Brights Button with another glue dot. Then I couldn't stop until I topped it off with a gorgeous PEARL with yet another glue dot!  Just love those little pearls, don't you? 
 The inside is scraps of the same Sweet Pea DSP - corner photo punched pieces of the opposite side of the DSP. The sentiment is stamped on W.W. and I added a few butterflies from the "So Happy for You" SAB set.
Done!
See told you it was a quick post!


Hootie says "Thanks so much for stopping by and please leave a comment".

Hugs!

Diane

March 20, 2011

Paisely Petals & Four Frames Clean and Simple {PP#39}

Tonight's post is another very quick and easy card for The Paper Players Clean And Simple sketch challenge #39. Here is the CAS sketch.
 I just happened to be playing around with the new Paisley Petal DSP [LOVE IT] and the new Four Frames [LOVE THEM] stamp set yesterday and I couldn't stop. I made 4 cards before I knew what time it was. When I saw this sketch I believe this card will meet the requirement for this challenge, except it is turned sideways for the sketch. In other words, a regular A2 card. Here is my card.
I know this doesn't look like the typical CAS card but the DSP does all the work! I used a base of Natural White CS. I cut a piece of Paisley Petals DSP matted with Cherry Cobbler CS.
Then I scrunched a piece of cherry cobbler Seam Binding and taped to the back of the mat before adding to the card front.
Next I stamped one of the new Four Frames on whisper white CS and added a sentiment, both inked in cherry cobbler.  I used the Decorative Label punch and colored the flowers with my blender pens using cherry cobbler and pear pizzazz write markers. I punched a second label in cherry cobbler and off set it behind the W.W. label and mounted with two dimensionals.

I added a few sweet butterflies from the Butterflies Embosslit and put a tiny pearl on each. (Love those pearls don't ya know).
I haven't decided how I'm going to use this card, so I lined the inside with more of the DSP and will add a W.W. piece for the sentiment when the time comes to mail it.
Well there you have it... my CAS card that doesn't 'look' so CAS... but it really is.
This DSP is so pretty all by itself it really doesn't need much at all.

Hootie says "Thanks for stopping by and please leave a comment".

March 19, 2011

Pom Poms - SPRING is Coming!

Today's post was inspired by Gretchen Barron's card using the new Big Springtime Vintage buttons with the new Pom Pom trim. So cute! I just wanted to give it a try. Here is my card.
The card itself needs little explanation and went together pretty easy. I started with Natural White CS, and layered with some scrap olive DSP.
I stamped the flower leaves from the "Sweethearts" set in old olive ink on W.W. CS. I stamped a few more stems in old olive and added a few small flowers from other sets inked in tangerine tango and melon mambo. The little butterfly is from the SAB set "So Happy For You"  stamped in tangerine tango. I matted this W.W. piece on pumpkin pie CS mat.
I pulled a center thread of some pear pizzazz seam binding and gathered it to give it a scrunchy look and  wrapped it around the tangerine mat. I stamped the 'for you' from "Elements of Style" in melon mambo on W.W. and punched it out with a 3/4" circle. I punched a second 1" circle in melon mambo and glued the two together and then popped up on the seam binding with a pop dot.

Then I took a crumb cake Big Button and punched an orange circle from the Sweet Pea DSP {retired}and glued to the center with a glue dot. Then I wrapped the outer edge in sticky strip and wrapped a second time with the melon mambo pom pom trim. Aren't these pom pom flowers just so cute? I just loved how cute the pom poms look wrapped around the Big Buttons!! I attached with a large glue dot.

The inside is finished off with touches of DSP and colors from the front and I added a few photo corners punched in melon mambo.

 . 
Well that's it! Thanks Gretchen for the cute idea for using the pom pom trim on Vintage Big buttons.


Hootie says "Thanks for stopping by and please leave a comment on this pom pom button flower card."

March 17, 2011

Colour Q76 - Reflections

Hi everyone.
This is the first time I did a challenge for the Colour Q website so I'm pretty excited to see what they are all about as I see so many people talk about them on their blogs. So I hopped over there to take a peek... and here are the colors for this week... Wow! I struggled when I saw these colors; and here they are:

Tough right? Well they are for me.... I thought and thought and said WHAT in the heck can I do with this color combo. Then it came to me! I'll do a brayer card! I did about 30 of these cards for Troops a year ago and it is an oldie but goodie I called Reflections.
 I first saw this technique about two years ago from Michele Zindorf who is a "master" of the brayer technique. When I first read her instructions I said "OMG .. I'll never be able to do that!"  But once I did it I found it's not as hard as it seems. Now I can whip out brayer cards like no body's business. You just have to learn to GO FOR IT... if you don't like what you see, you brayer some more!. anyway back to my brayer cards I have some that are better than others, and I'll tell you now... this is NOT one my best, but it works for these colors; so here is my card.  

It's going to my friend that spends winters in Florida and she's always missing our weekly group of scrappers, so I decided to send her a little note that reminds me of Florida as I sit here watching the SNOW melt and wishing for SPRING!
The card itself needs very little explanation once your read Michele's directions that is! I used a piece glossy paper and brayer with old olive, kiwi, daffodil delight and early espresso.  My favorite part of this card is seeing the trees reflect in the water. So cool I think. There are some more suttle things if you look close though, other than the trees reflecting in the water that is. {that's my favorite part by the way}.
 If you click to enlarge it you can see the French script in more mustard on the left side of the card...just follow the water ripples made with a white gel pen and you'll find it.

I finished off the inside with a sweet sentiment and stamped a few more palm trees. Done!

 .Well I hope you liked my Reflections card and please leave a comment and tell me what you think.
OMG... I just realized I have TWO friends that spend winter in Florida... and the one that's probably going to read this post is not getting this card! But YOU (and you know who you are) is getting one of my NEW cards made with that yummy new DSP. Ok? Ok! whew... almost thought I was in trouble! 

Hootie says "Thanks for stopping by today"!.

March 13, 2011

Paper Players - Ann's Color challenge #38

Hi everyone... back again!
This posting is for the Paper Players - Ann's Color challenge #38, and what pretty colors they are.. what do you think? Baja Breeze, Blushing Bride Early Espresso and Very Vanilla. Beautiful soft colors.
Here is my card.
I started with crumb cake base and embossed with the Elegant Lines emboss folder, then highlighted the embossed lines with espresso ink and a dauber to really make the lines stand out. Next I stamped two butterflies from the "Thanks for Caring" set in the occasions mini; one in baja breeze ink and the other in early espresso ink. I search my stash and decided to use some pale pink pearls I found that matched blushing bride to a tee, and ...  I only six left. Perfect!
Now here comes the sad part.. and pretend you don't notice, but as I went to apply the very last one to the butterfly's body... my tweezers pinched it and that sucker went flying. Heaven only knows where it is ... because I LOOKED HARD to find it, but no luck. So just pretend there are SIX pale pink pearls. Shhhh
I applied two strips of DSP to the front of the card. I used the scallop trim border punch on the baja breeze DSP from the Springtime Vintage and  I used a solid scallop border punch on the Blushing Bride DSP from the Designers Series pack. I punched hole where the two DSPs met and then wrapped crumb cake Seam Binding around the card used the no slip bow technique to secure my bow knot.
Next I used the "Elizabeth" stamp in espresso ink and cut it out, then distressed with baja breeze ink around the edges and slightly into the design. I stamped the sentiment from "Thanks for Caring' in espresso in, punched it out with the oval punch and inked the edge with baja breeze. I popped it up on the Elizabeth center with dimensionals, then popped the entire grouping up again with more dimensionals. I added a tiny flower from the Itty Bitty punch set in baja breeze DSP and added a white pearl to the center.
The finishing touch was to color a Rosette (LOVE) with a blushing bride write marker and added under my knot with a glue dot. {I so hope these rosettes carry over to the new IBC}.
I finished the inside with touches from the front and stamped the flower from  "Thanks for Caring" and sentiment from an older set (the name slips my mind).
Last but not least I finished my envelope off by lining it with some blushing bride DSP.
Well that is my card for the Paper Players Color challenge and I hope you like it. 

Hootie says "Thanks for stopping by and please leave a message". 

Hugs
Diane 

March 12, 2011

Chocolate Easter Bunny {PPA84}

Hi everyone!
 I am posting for the Pals Paper Arts 'Spring - Easter' challenge #84 today. Oh how I wish it WAS spring here in Michigan, but we keep getting pounded with SNOW. Just when you think it's over and you can see the grass............ you wake up to more of the white stuff! 
 I am so over the winter and I just can't wait for SPRING to get here.

Well I decided to get out my sweet little chocolate Easter Bunny stamp that I showed up in last years mini but is now current. When I saw it, I just had to have it because it reminds me of the Sander's 'solid' Chocolate Easter Bunny we would get in our Easter baskets. We didn't have much growing up (but we never noticed) and to get a genuine SOLID chocolate bunny in our Easter basket was the Best thing ever;  and my mom always made sure it was Good Sander's chocolate! Yeah baby! Anyway that stamp is the Exact replica of that Sander's bunny. I can almost taste it. But since Sander's is no longer around............ I just had to pop a Hershey's chocolate kiss in my mouth so I could finish this post.

 Well enough of that... here is my card. I had this great plan to frame it and give some dimension. Well...
 I don't like it as well as the one I made last year, but it will have to do. Between you and me.... it looked much cooler in my mind!


I started with a olive card base than stamped my grass from 'Inspired by Nature' in olive, then heat embossed my 'Chocolate Bunny' in chocolate chip embossing powder on whisper white card stock.
I stamped the sentiment from last year's SAB in taken with teal. [in hindsight I would use Pear Pizzazz CS in place of the Olive].   

Then I used my Ovals die to cut some Easter eggs out of my scraps. I popped the top egg with a dimensional and poked the top out of the frame. I also used my Butterflies embosslit to get a few butterflies from scrap retired DSP, and the tiny one I placed on the bunny's nose.  Too cute, don't you think?

Now for the frame... I wanted to use the Top Note die to frame my bunny, so I die cut it in pale pink. Then I used the negative piece from the die cut and popped it up with dimensionals.

Then I used the Top Note piece on the inside to mount my sentiment on a W.W. egg in Taken with Teal ink and sponged the edges lightly.  I stamped a small bunny in choc. chip and added a few more scrap DSP eggs, and the mid sized butterfly to add touches from the front.

 Done. Hope you like my spring theme card.

Hootie says "Thanks for stopping by and please leave a comment".  I read them all!
 Hugs,
Diane

LinkWithin

Related Posts with Thumbnails